Manual data entry in Excel is time-consuming and error-prone. Whether you're updating financial records or inventory lists, endless copying and pasting leads to fatigue and mistakes that can cost time and money. Such tedious work not only decreases productivity but also puts the accuracy of your data at risk.
Excel Automation solves these challenges, helping you save valuable time, reduce mistakes, and enhance your overall efficiency. By automating entry tasks in Excel, you can optimize your workflow and focus on more important, high-level tasks.
Flair HR notes that 76% of businesses use automation to standardize daily workflows, highlighting its widespread adoption and effectiveness in improving operational efficiency.
In this guide, we’ll explore step-by-step how to use Excel features and automation tools to cut down manual data entry. You'll learn multiple methods to streamline spreadsheet workflows from built-in data entry forms to advanced VBA scripts.
Looking for the best data entry software to enhance your productivity further? Consider exploring our comprehensive guide on the Best Data Entry Software in 2026 to simplify your processes.
Key takeaways:
- Excel has built-in tools (Forms, Data Validation, Macros, Power Query) to automate repetitive data entry tasks.
- Advanced options like VBA scripting or integrations can handle complex scenarios.
- Automation saves time and reduces errors, allowing you to focus on higher-value work.
- Tools like Parseur can automate data extraction from external documents into your spreadsheets.
Excel's built-in data entry forms
Microsoft Excel has a built-in feature that allows users to create simple forms, streamlining the process of adding new records. This feature is beneficial when working with larger datasets or when you need to collect structured information.
Excel's data logging forms allow you to enter data directly into a table without navigating through each cell individually.
Step-by-step guide:
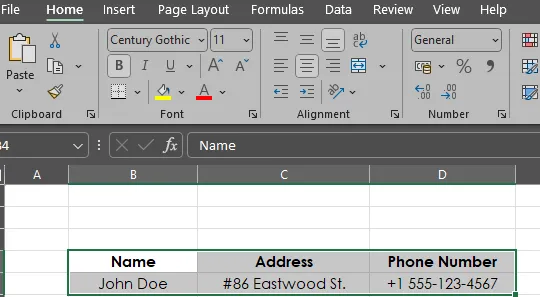
- Select your data range: Make sure the first row contains headers describing the data type in each column (e.g., Name, Address, Phone Number).
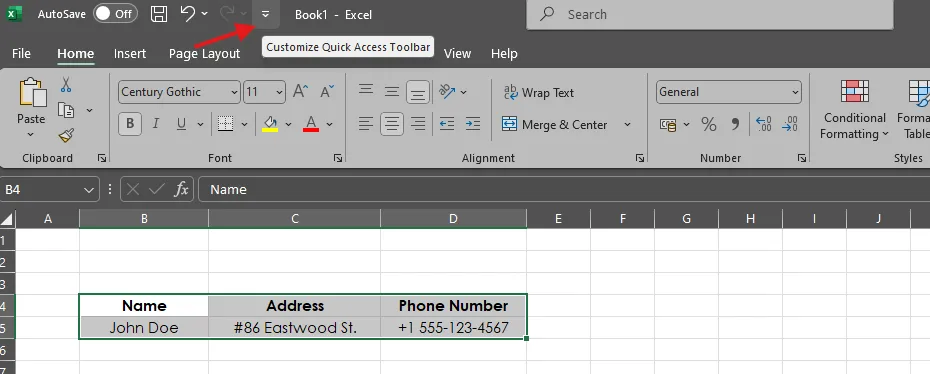
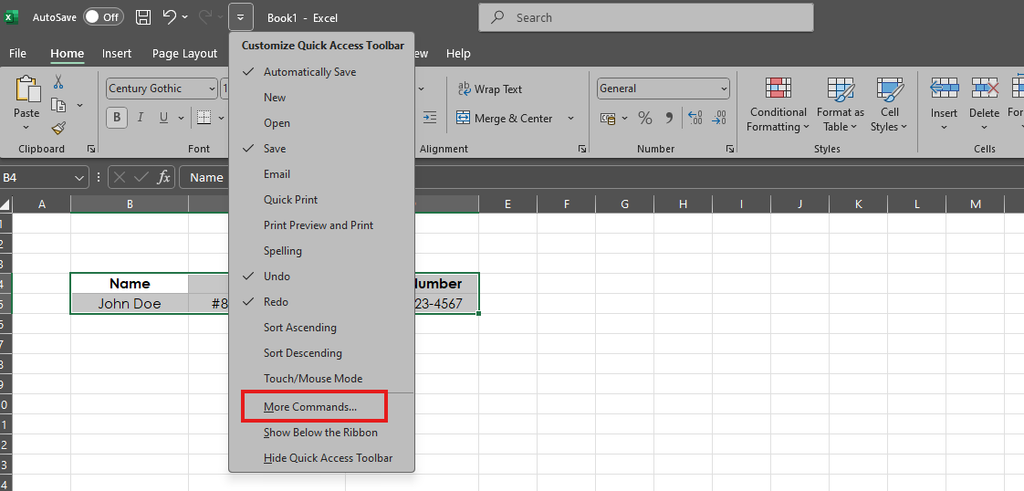
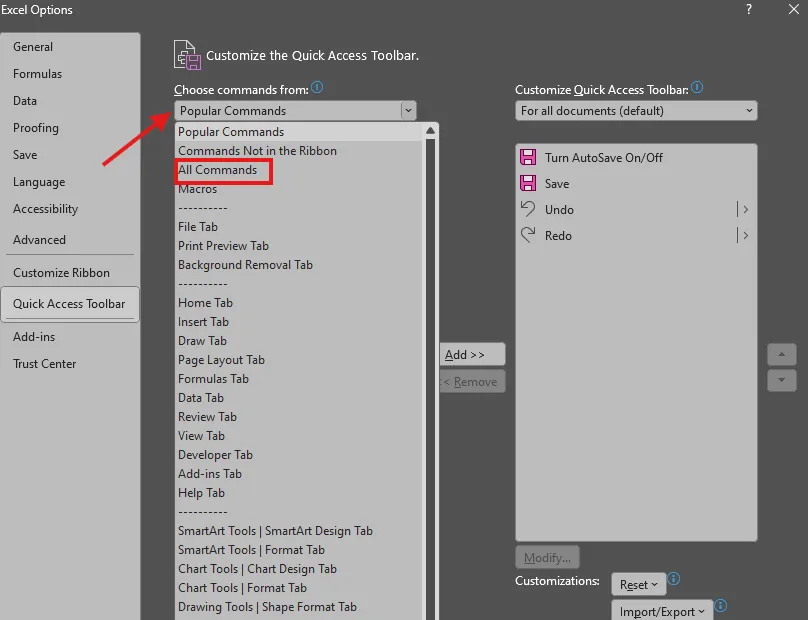
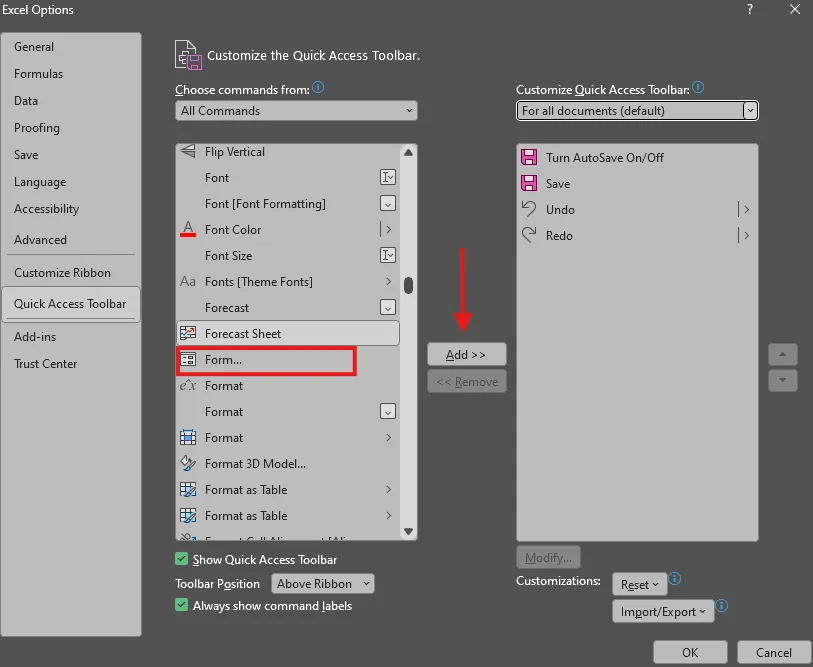
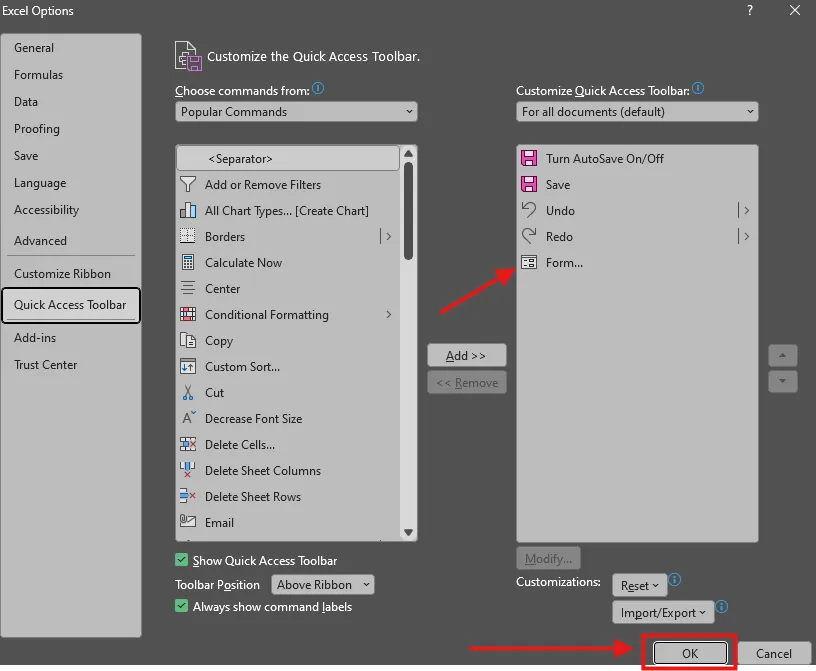
- Enable the Form option: Go to the Quick Access Toolbar and click the dropdown arrow. Choose More Commands, and under Choose commands from, select All Commands. From the list, select Form and add it to your toolbar.
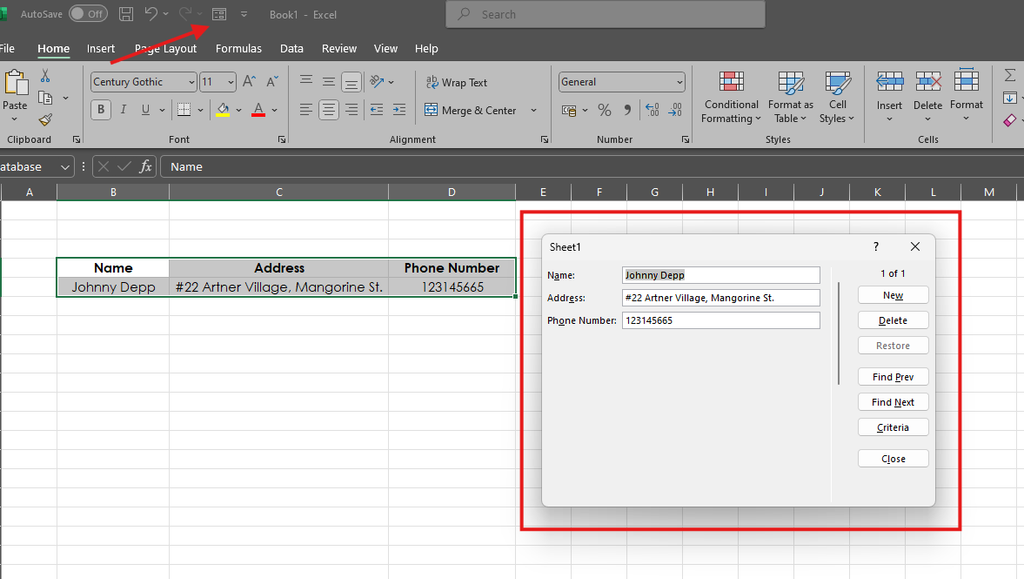
- Using the Form: Click on the Form button from the toolbar. A form interface will appear, showing each column header from your table.
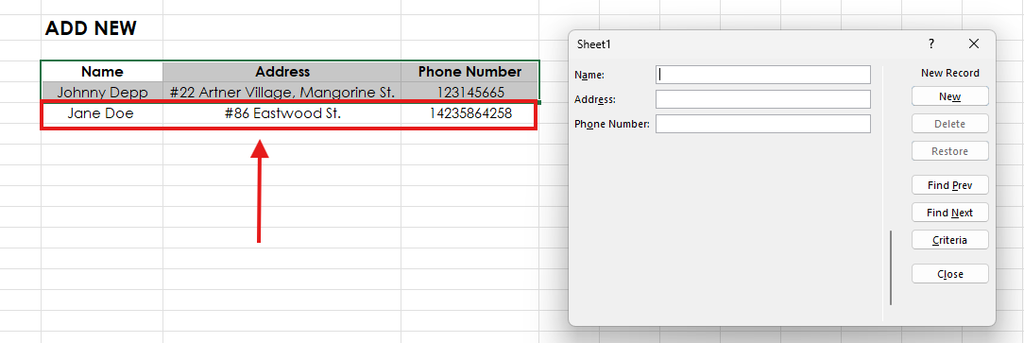
- Add, search, and edit records: Use the New button to add a record, the Find button to search for specific entries, and the Delete button to remove records. The form automatically updates your table with any changes you make.



See Microsoft’s official guide to Data Entry Forms for more details.
Benefits:
- Time-saving: Easily enter multiple records without scrolling through rows and columns.
- Accuracy: Reduce human errors by entering data in a structured form rather than individual cells.
- User-friendly: Great for Excel users who prefer not to use advanced features like VBA or macros.
Implementing data validation for controlled inputs
Manual data entry often leads to typos, incorrect formatting, or invalid values. Excel’s data validation feature helps maintain data accuracy by restricting inputs based on predefined rules.
Unstop highlights that data validation enhances input by offering predefined choices via dropdowns, enhances clarity with input messages and error alerts, and boosts efficiency by minimizing manual corrections.
This section will guide you through setting up drop-down lists, numerical limits, and custom validation rules to enhance data quality.
How does data validation help?
- Ensures consistency by restricting input types (e.g., only numbers, dates, or specific text values).
- Reduces errors by preventing invalid data capture.
- Saves time by guiding users to enter the correct information.
Step-by-step: Setting up data validation in Excel
1. Create a drop-down list for predefined inputs
Drop-down lists help users select from predefined options, reducing input errors.
Steps to create a drop-down list:
- Select the cells where the drop-down list should appear.
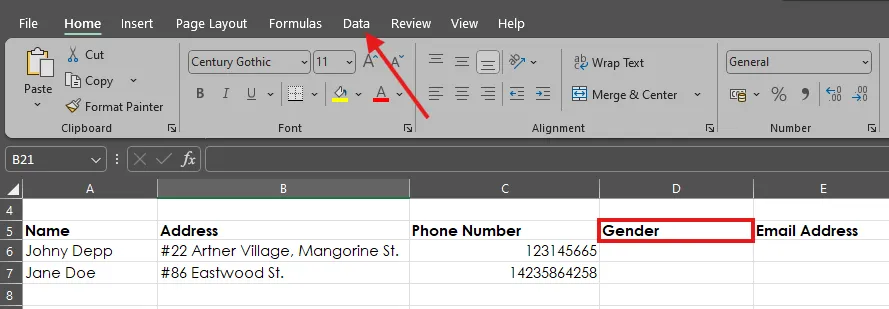
- Go to the Data tab and click Data Validation.

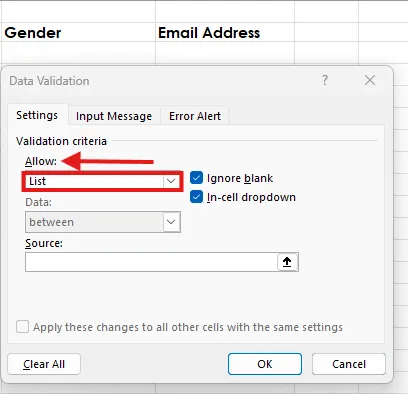
- In the Allow section, choose List.
- Enter the allowed values manually (comma-separated) or select a range from another sheet.
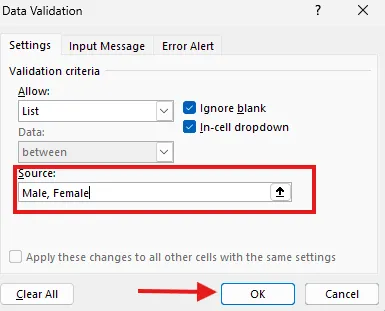
- Click OK—your drop-down list is now ready!

2. Set numerical limits to prevent invalid entries
You can restrict numerical inputs to ensure values fall within a specific range.
Steps to set number limits:
- Select the target cells, go to the Data tab, and click Data Validation.

- Go to Data Validation > Settings.
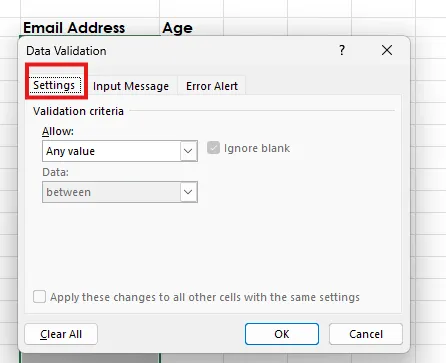
- Under Allow, choose Whole Number (or Decimal for floating-point values).
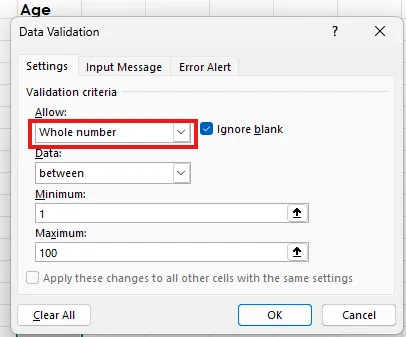
- Set a Minimum and Maximum value.
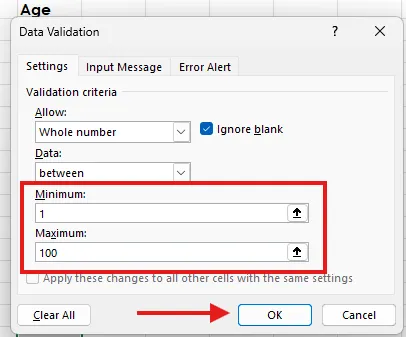
- Click OK.
3. Use custom formulas for advanced validation
For more flexibility, you can apply custom formulas to validate data dynamically.
Example: Allowing only email addresses
- Select the target column (e.g., an email entry column), go to the Data tab, and click Data Validation.

- Go to Data Validation > Settings.

- Under Allow, choose Custom.
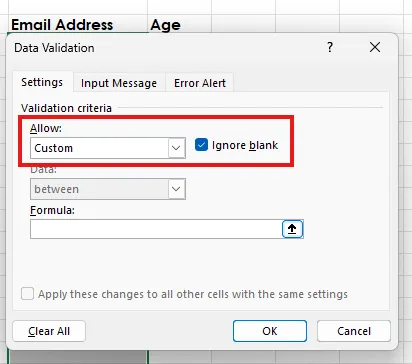
- Enter the formula:

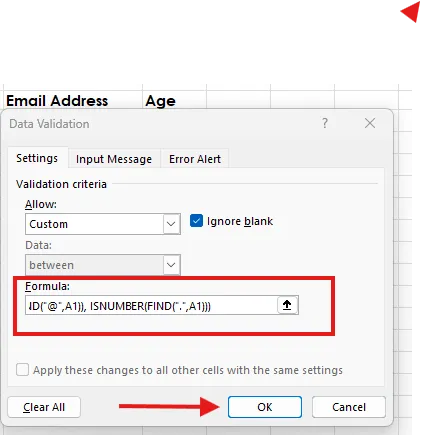
- Click OK—this ensures only email-like entries are accepted.
Best practices for data validation
- Use Input Messages to guide users on proper record input.
- Set Error Alerts to notify users when incorrect data is entered.
- Keep validation rules updated as business needs evolve.
Automating repetitive tasks with Macros
Macros offer a solution by recording a series of actions and replaying them with a single click. This section will cover creating and using macros to simplify data capture.
What are macros in Excel?
A macro is a recorded sequence of actions that Excel can execute automatically. Macros help in:
- Reducing repetitive work by automating standard data processes.
- Improving efficiency by eliminating manual steps.
- Minimizing errors by ensuring consistency.
Step-by-step: Recording a macro in Excel
1. Enable the Developer tab
The Developer tab is not visible by default, so it must be enabled first.
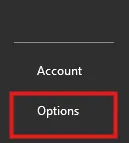
- Go to File > Options > Customize Ribbon.

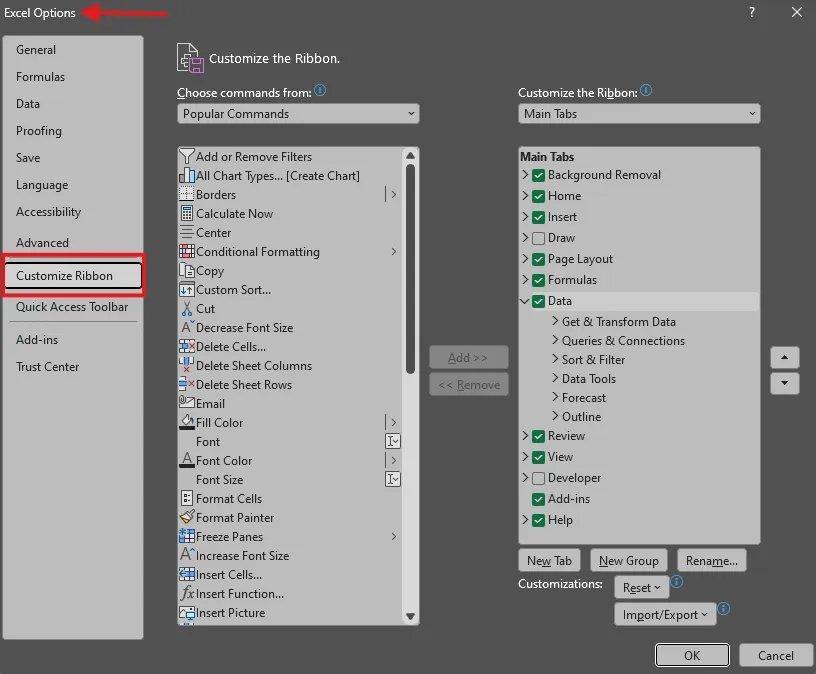
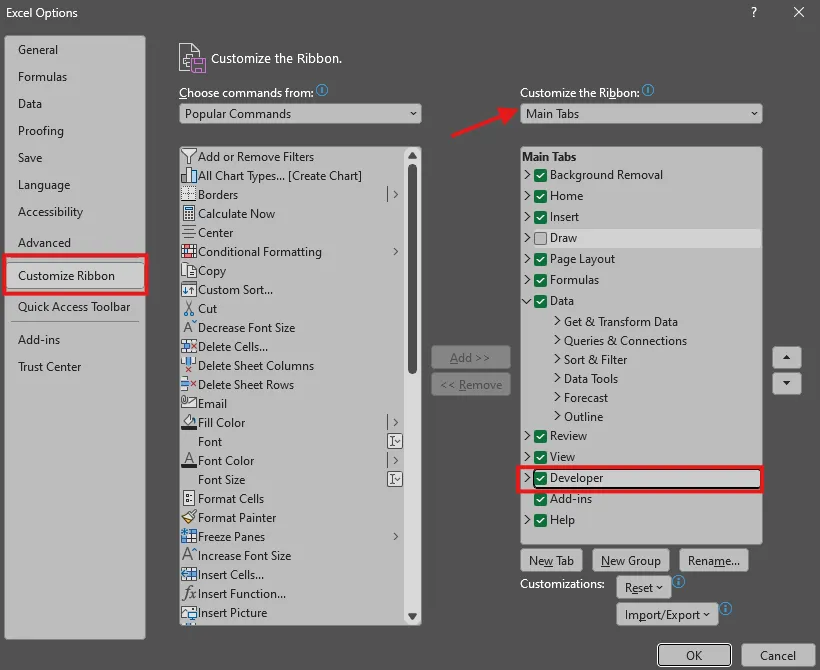
- Check the box for Developer and click OK.
2. Record a macro
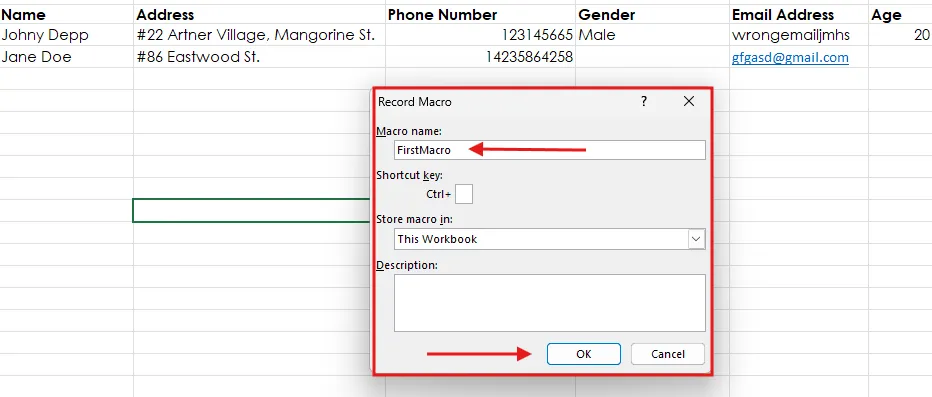
- Click on the Developer tab and select Record Macro.

- Give your macro a name and choose where to store it:
- This Workbook (for use in the current file).
- New Workbook (for use in a new file).
- Personal Macro Workbook (to use it across multiple workbooks).
- Perform the actions you want to automate (e.g., entering data into a table).
- Click Stop Recording when done.
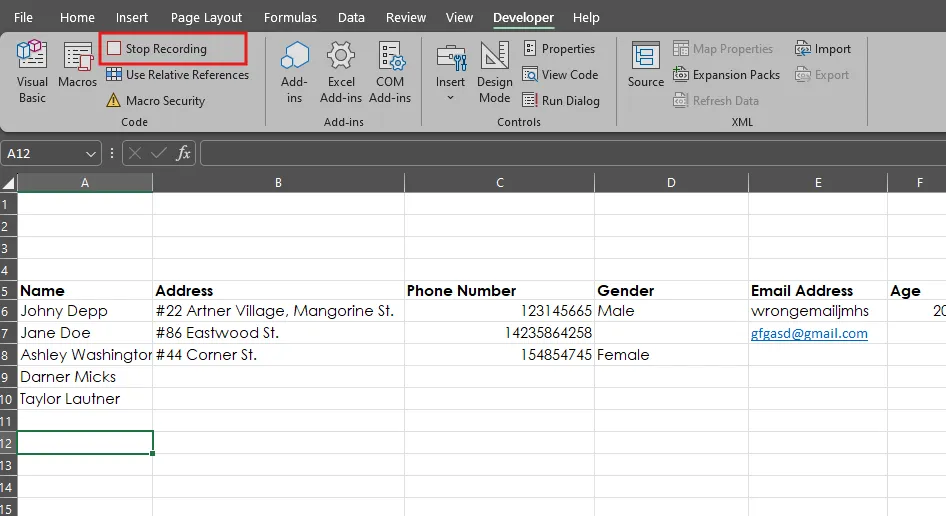
Assigning the macro to a button for easy access
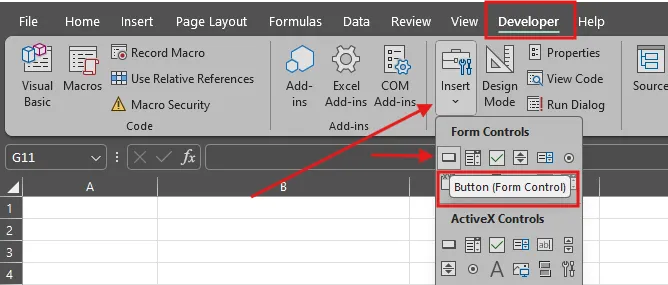
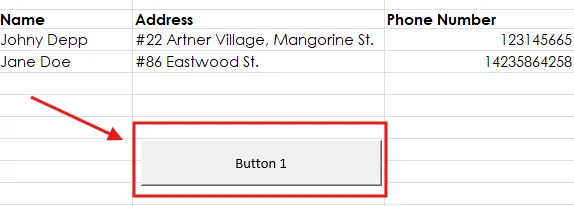
- Go to the Developer tab and click Insert > Button (Form Control).
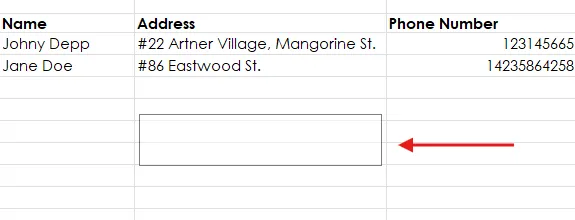
- Draw the button on the worksheet.
- In the Assign Macro window, select the recorded macro and click OK.
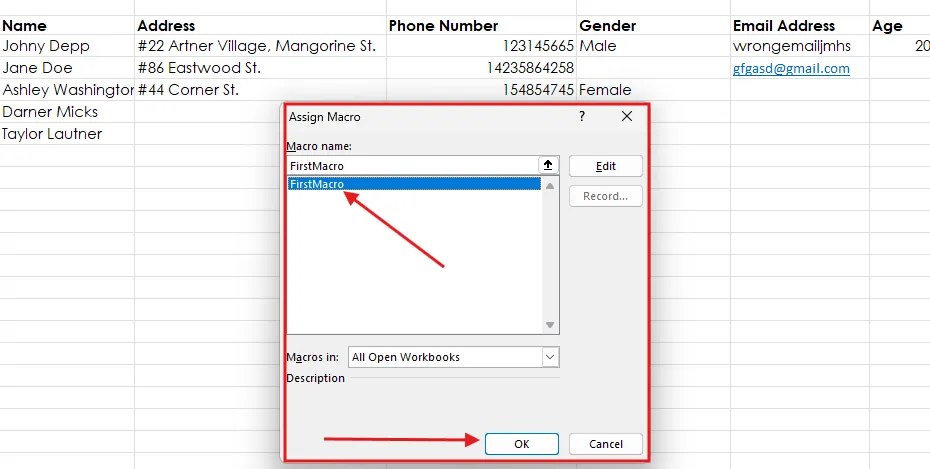
- Clicking this button will now execute the macro.
Best practices for using macros
- Keep macros simple by focusing on specific tasks.
- Test macros regularly to ensure they perform as expected.
- Please save your work before running macros, as they cannot be undone.
- Enable macro security settings to prevent running malicious scripts.
Advanced Excel automation with VBA
If macros don’t offer enough flexibility, Excel’s programming language – Visual Basic for Applications (VBA) lets you automate virtually anything. VBA scripting empowers you to handle multiple steps, apply conditional logic, and create custom input forms for complex data entry tasks.
What is VBA?
VBA (Visual Basic for Applications) is a programming language built into Excel that allows users to:
- Automate repetitive tasks across multiple sheets.
- Perform conditional data entry based on predefined criteria.
- Create user-friendly forms for structured record input.
While VBA requires some coding knowledge, even beginners can use simple scripts to enhance efficiency.
Step-by-step: Writing a VBA script for data entry automation
1. Open the VBA Editor
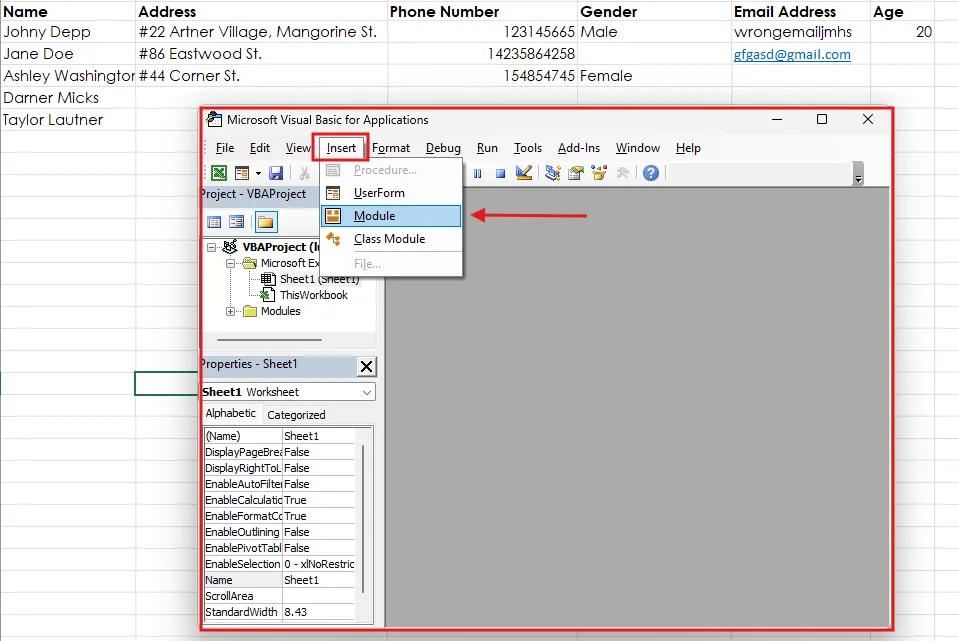
- Go to the Developer tab and click Visual Basic.

- In the VBA editor, click Insert > Module to add a new script module.
2. Write a simple VBA script
Here’s an example of a script that adds values from an input sheet to a database sheet:
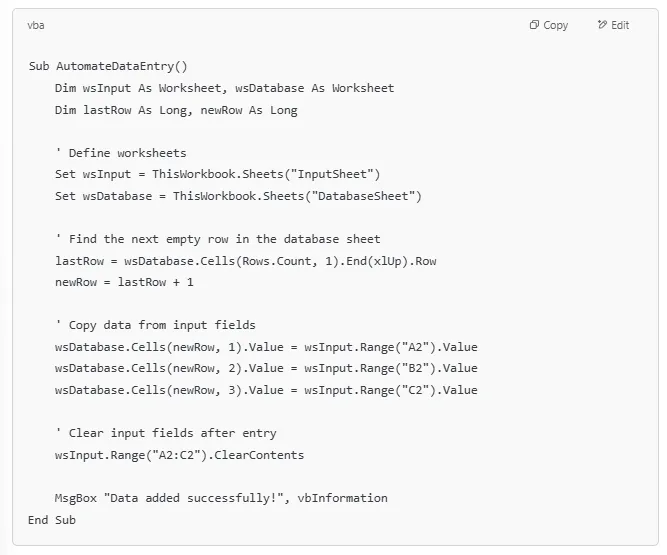
This script:
- Retrieves data from an "InputSheet" and appends it to a "DatabaseSheet."
- Automatically finds the next available row to enter data.
- Clears the input fields after submission.
3. Run the script
- Close the VBA editor and return to Excel.
- Press ALT + F8, select AutomateDataEntry, and click Run.
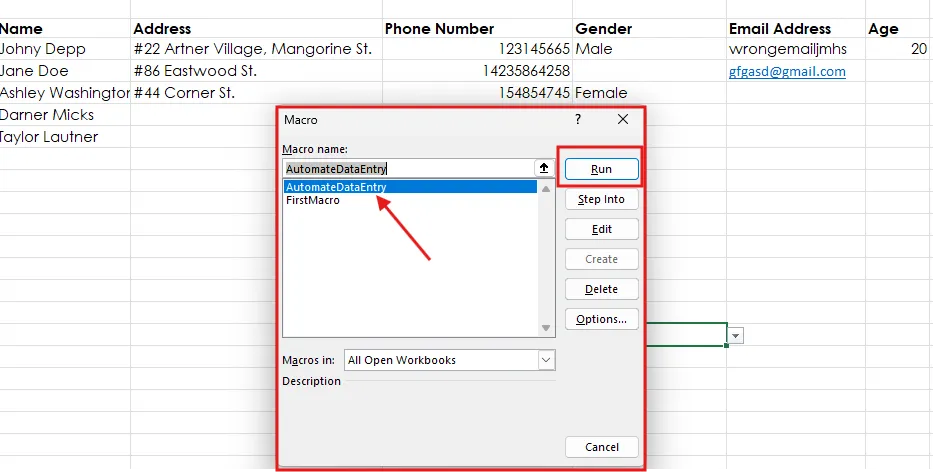

- The script will transfer data and confirm completion with a message box.
Reminder! Save your work before running VBA scripts!
Before executing any VBA automation, ensure you have saved your work. VBA scripts can modify or overwrite data, and macros have no built-in undo option. Keeping a backup prevents accidental data loss.
Best practices for using VBA automation
- Always save your work before running VBA scripts.
- Test scripts on sample data before applying them to large datasets.
- Ensure macros are enabled under Excel security settings.
- Use comments in VBA code to make scripts more straightforward to understand and modify later.
Power Query for data import automation
Power Query is a powerful tool in Excel that allows users to import, clean, and transform data automatically from multiple sources. According to Quantum Analytics NG, Power Query significantly reduces manual labor by automating data transformation processes, which can save hours of work and minimize errors. It also eliminates the need for manual data entry and repetitive formatting tasks by streamlining the data consolidation process.
Step-by-step guide to using Power Query
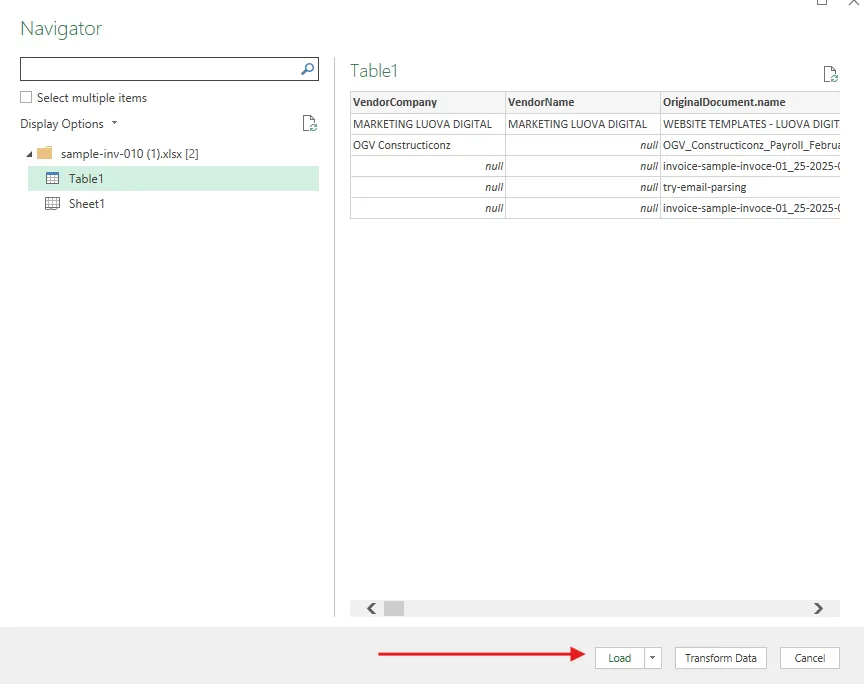
- Open Power Query and connect to a data source
- Go to the Data tab in Excel and select Get Data.

- Choose the data source (another Excel file, CSV, database, or web data).
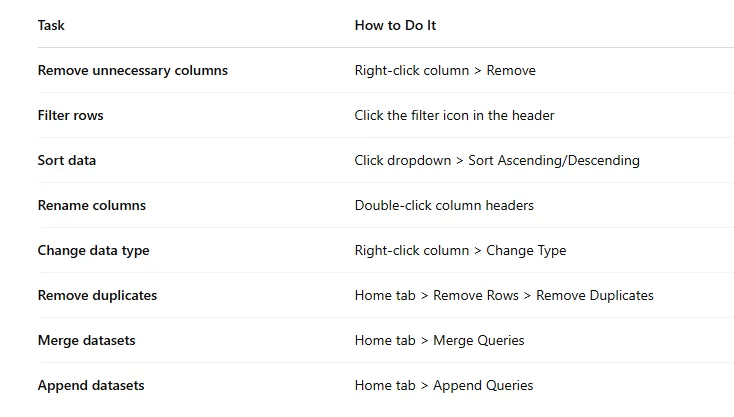
- Transform the data as needed
- Use Power Query’s interface to filter, sort, and clean data.
- Merge or append data from multiple sources.
- Remove duplicates and apply specific formatting.
- Load the transformed data into your workbook
- Click Close & Load to import the final dataset into Excel.
- The query remains linked, meaning you can refresh it to get updated data without manually re-entering information.
Benefits of using Power Query for automation
- Automates data imports: No need to copy-paste data manually.
- Reduces human error: Ensures consistency and accuracy in data processing.
- Saves time: Processes large datasets quickly and updates them with a single click.
- Integrates with multiple data sources: Works with Excel files, databases, web services, and cloud-based storage.
Power Query is an essential tool for businesses that import data frequently. It minimizes the risk of errors while making the process efficient and scalable.
Best practices for data entry automation in Excel
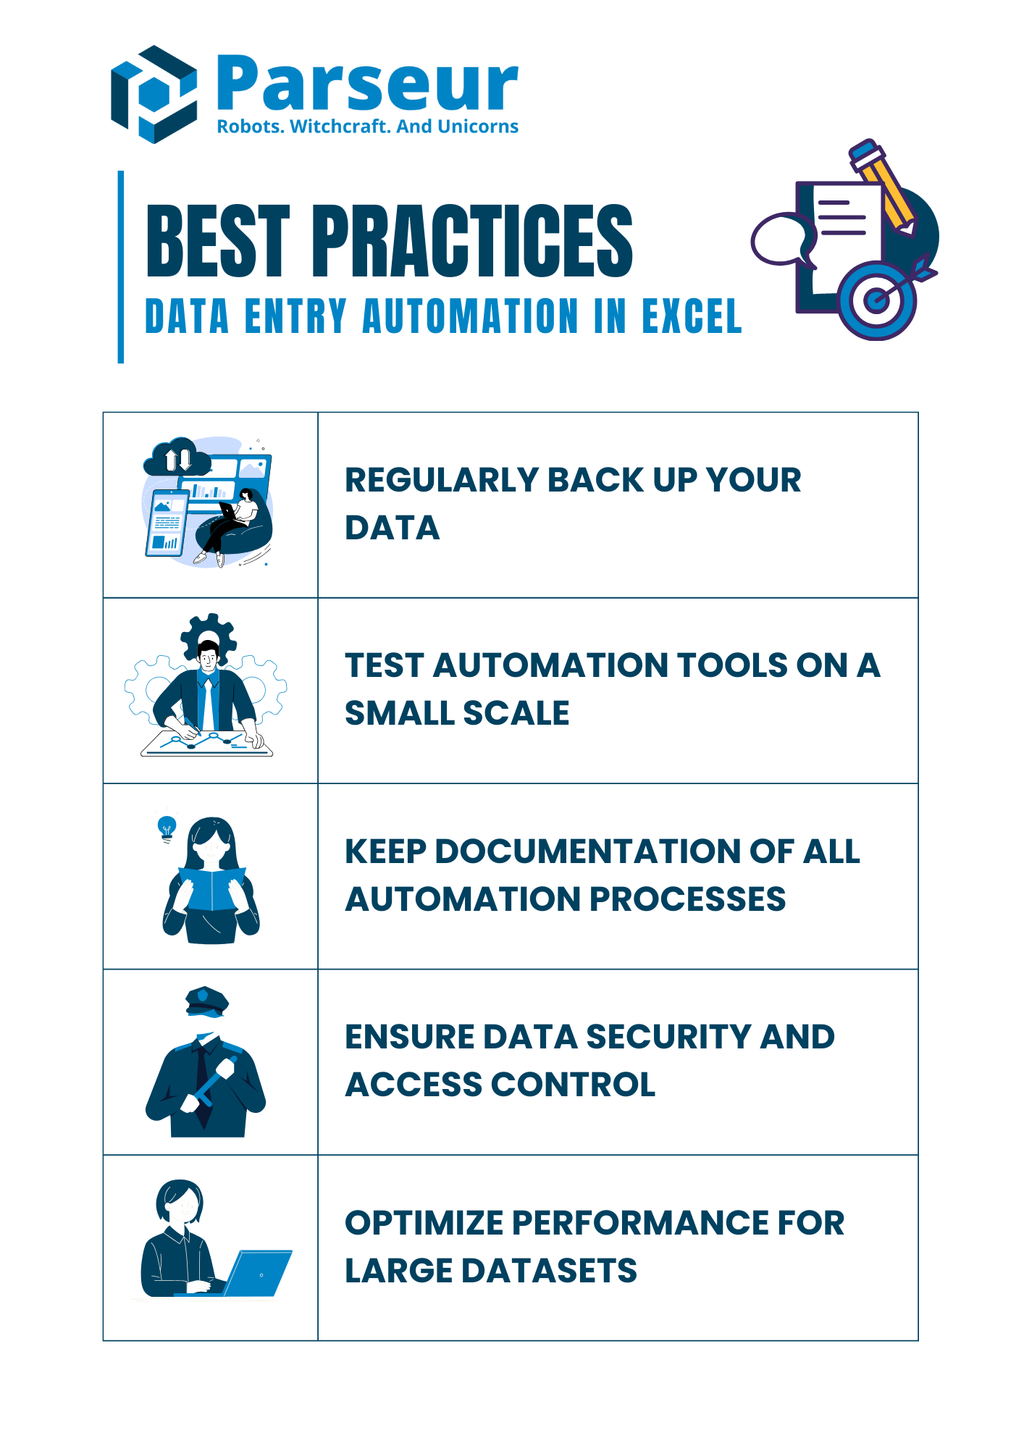
Automating data entry in Excel can significantly improve efficiency, but it’s essential to follow best practices to ensure smooth implementation and long-term success. Proper planning, regular testing, and documentation of automation processes will help prevent errors and maximize productivity.
1. Regularly back up your data
Before making any automation changes, always create a backup of your Excel file. This ensures you have a copy in case of unexpected errors or data loss.
2. Test automation tools on a small scale
Before applying automation to large datasets, test your macros, VBA scripts, or Power Query processes on a small sample. This helps identify and fix issues before they impact critical data.
3. Keep documentation of all automation processes
Maintain records of macros, VBA scripts, Power Query steps, and data validation rules. Documenting these processes ensures that other team members can understand, troubleshoot, and update automation settings.
4. Ensure data security and access control
- Protect workbooks containing automated scripts to prevent unauthorized modifications.
- Use password protection for sensitive files and restrict access to specific users.
- Be cautious when enabling macros, especially in files received from external sources.
5. Optimize performance for large datasets
- Avoid excessive use of volatile formulas (e.g., INDIRECT, OFFSET) as they slow down calculations.
- Use structured tables and named ranges to organize data efficiently.
- Limit the use of complex VBA scripts that may increase processing time.
By following these best practices, businesses and professionals can maximize the benefits of this automation while maintaining accuracy, security, and efficiency.
Common challenges and troubleshooting tips
Even with well-implemented automation, users may encounter issues that disrupt workflows. Understanding and troubleshooting these challenges can help maintain smooth and efficient data input processes.
1. Why won’t my Excel macros run?
Issue: They may be disabled by Excel’s security settings.
Solution:
- Go to File > Options > Trust Center > Trust Center Settings.
- Under Macro Settings, enable “Enable all macros” (only for trusted workbooks).
- Save the file as a macro-enabled workbook (.xlsm).
2. VBA scripts returning errors
Issue: The script produces errors, causing incorrect or incomplete automation.
Solution:
- Use Debug mode in the VBA editor (Alt + F11) to step through the code and identify the error.
- Check for typos in variable names or incorrect range references.
- Ensure all required libraries are enabled in Tools > References.
3. Data validation rules are not applying correctly
Issue: Users can still enter invalid data despite validation rules.
Solution:
- Double-check that the validation rule is applied to the correct range.
- Verify that “Ignore blank” is unchecked if blank entries should be restricted.
- Ensure dropdown lists reference the correct named range or source data.
4. Power Query not refreshing data
Issue: Automated data import does not update when new data is available.
Solution:
- Go to Data > Queries & Connections and manually refresh the query.
- Ensure the correct data source path is referenced, especially if files were moved.
- Set Power Query to auto-refresh by enabling “Refresh every X minutes” under Query Properties.
5. Slow performance with large datasets
Issue: Excel becomes unresponsive when processing automation tasks.
Solution:
- Reduce unnecessary calculations by switching to Manual Calculation Mode (Formulas > Calculation Options > Manual).
- Optimize VBA scripts by using screen updating and calculation suspension:

- Use Power Query or Power BI to handle large datasets instead of VBA.
Following these troubleshooting steps can help prevent disruptions and keep the automation running smoothly.
Other Ways to Automate Spreadsheet Data Entry
While Excel’s built-in tools like macros, data forms, and Power Query are powerful, there are several other ways to automate spreadsheet data entry, especially when your data originates from outside sources or across multiple applications.
Use Integration Tools Like Zapier or Power Automate
Zapier and Microsoft Power Automate allow you to create no-code workflows (or “Zaps” and “Flows”) that automatically move data from one app to another. For example, you can collect new form responses, emails, or CRM entries and push them into your Excel spreadsheet.
For example:
- A new Google Form submission can trigger a Zap that adds a row to your spreadsheet.
- An incoming email attachment can be parsed and the data sent to Excel via Power Automate.
- Platform updates like Salesforce, HubSpot, or QuickBooks can be automatically synced with your spreadsheet for real-time reporting.
Learn more about Parseur + Power Automate integration and Parseur + Zapier integration.
Automate with Python Scripts
For technical teams, Python offers extensive libraries like openpyxl, pandas, or xlwings to automate complex Excel tasks programmatically. This is ideal for:
- Bulk updating multiple spreadsheets
- Cleaning and transforming data
- Performing scheduled imports from CSVs, APIs, or databases
While Python provides excellent flexibility, it does require coding knowledge and ongoing maintenance.
Automate Data Extraction with AI (Using Parseur)
If your spreadsheet data comes from emails, PDFs, scanned documents, or online forms, you can eliminate manual entry using AI-powered document processing.
Parseur allows you to automatically:
- Extract data from PDFs (e.g., invoices, receipts, reports)
- Parse email content or attachments
- Send clean, structured data directly to Excel via Zapier, Make, Power Automate, or API.
With a one-time workflow setup, Parseur can save hours of repetitive work each week and significantly improve data accuracy.
Conclusion
Automating data in Excel can significantly improve efficiency, accuracy, and productivity. Users can simplify repetitive tasks and reduce manual effort by leveraging built-in tools like macros, VBA, and Power Query.
For those seeking an even more powerful, hands-off solution beyond Excel, consider Parseur. Parseur is an AI-driven tool designed to automatically extract data from sources like emails, PDFs, and other documents and send it directly into your spreadsheet or database. In other words, it tackles the data entry for you – no copying from external files into Excel. This can save you even more time and virtually eliminate manual errors.
You can start with simple automation techniques in Excel, then explore more advanced options or tools like Parseur as your needs grow.
Frequently Asked Questions
Automating data entry in Excel can save time and reduce errors, but many users have questions about the process. Here are quick answers to common concerns about security, limitations, and the best automation methods.
-
Can I automate data entry without coding?
-
Yes! You can use data entry forms, Macros, and Power Query—no coding is needed. You can also use a data entry software like Parseur for data automation.
-
How do I keep automation secure?
-
Before automating, only trusted macros in the Trust Center and backup files should be enabled. If you invest in data entry software, ensure it complies with the regulations.
-
What are Excel automation limits?
-
- Slower with large datasets (use Power BI for big data).
- Macros & VBA work best on Windows.
- Linked files may break if moved.
-
How do I pull data from another Excel sheet?
-
- Use Power Query for automatic imports.
- Use VLOOKUP, INDEX/MATCH, or XLOOKUP for dynamic linking.
- Use VBA for complex automation.
-
When should I use a third-party tool instead of Excel for data entry automation?
-
If your data comes from external sources or you must integrate multiple apps.
-
Can I automate data entry in Google Sheets?
-
Yes, many of the principles are similar. Google Sheets can use Google Forms for data entry or Google Apps Script for automation. Add-ons and integrations are also available.
Last updated on


